Home printing fails the same few ways. The imposed PDF measures perfectly on screen, then comes out shifted, shrunk, or upside-down on the back. None of that is the imposition. It's the path between the file and the paper, and three distinct things act on it. A driver scale setting (or the browser) shrinks the whole page a few percent, so every measured distance shrinks with it. The printer's unprintable border clips the edges it can't reach, shrinking the printable area the page has to fit into. And the way the sheet feeds through for the second side drifts the back image relative to the front. Each one is a different mechanism with a different fix, and in bookbinding a few millimeters is the difference between a fold that lands and one that doesn't.
Why is my printed PDF smaller than it looks on screen?
Because a "fit to page" or "shrink oversized pages" setting is scaling it down, usually to about 96–98% of actual size. Turn that off and print at Actual Size (100%).
Imposition is geometry. Every distance on the sheet — the gutter, the fold position, the page-number margin, the front-to-back registration — is measured in absolute units. Scale the whole page down by a couple of percent and all of those distances scale with it. The front and back no longer meet at the fold, even though each side looked fine on its own.
Two settings cause this, and both are silent:
- "Fit to page" / "Shrink oversized pages" in the print dialog. A sheet drawn at 100% prints at roughly 96–98%. Small enough that you won't notice by eye, large enough to throw off a fold.
- Printing from the browser. Chrome and Firefox reflow the page for print — adding their own headers and footers along the way — and shift the content several millimeters in the process. That shift can run to 5 mm or more, enough to wreck duplex alignment on its own.
Folio writes PrintScaling: None into the output PDF's viewer preferences, which tells a conforming PDF reader to default its print dialog to "Actual Size." That's a default, not a lock. A viewer can still be overridden, and the browser ignores it entirely.
One setting can shrink or enlarge the page: borderless printing. It can help a booklet, but only when scaling is also pinned to None. See the borderless section below before you turn it on.
What printer settings do I need for booklet imposition?
Open the PDF in a real viewer and print at 100% with no margins, no headers, and two-sided printing on — that's the short version of the checklist below. The one thing the file can't set for you is your printer's binding edge, so set that yourself to match the flip direction you told Folio (more on this in the upside-down backs section below). If you'd rather have these reminders travel with the file, Folio can also add an optional instruction sheet to the PDF that repeats them. The full checklist:
- Open the file in a real PDF viewer — Preview, Acrobat Reader, or Document Viewer — not the browser.
- Scale: Actual Size or 100%. Never "Fit to Page."
- Paper size in the dialog must match the sheet size you imposed for.
- Margins: None.
- Headers and footers: off.
- Two-sided (duplex): Select "Print on both sides" / "Two-sided." For correct backs, set the driver's flip edge to match the flip direction you told Folio (see the upside-down backs section below).
To confirm scaling is right before you commit a stack of paper, print Folio's calibration sheet and measure the 100 mm scale bar on it with a ruler. If it isn't exactly 100 mm, your scale is wrong — fix the dialog and reprint.
What printer settings actually print Folio output correctly?
Here is a real setup that prints Folio output correctly on a consumer inkjet. The screenshots are an HP ENVY on Linux Mint, but the choices map to any printer and any platform.
The General tab is the easy part: pick your printer, leave Copies at 1, keep Collate on and Reverse off. Folio already put the pages in the right order, so reversing them only gathers your signatures back-to-front.

The Page Setup tab carries the geometry. Scale reads 100.0%, two-sided is set to the edge the printer flips on, and the preview shows the page at its full 8.5 by 11 inches with no shrink. Paper size is US Letter (Borderless), which is the interesting choice covered below.
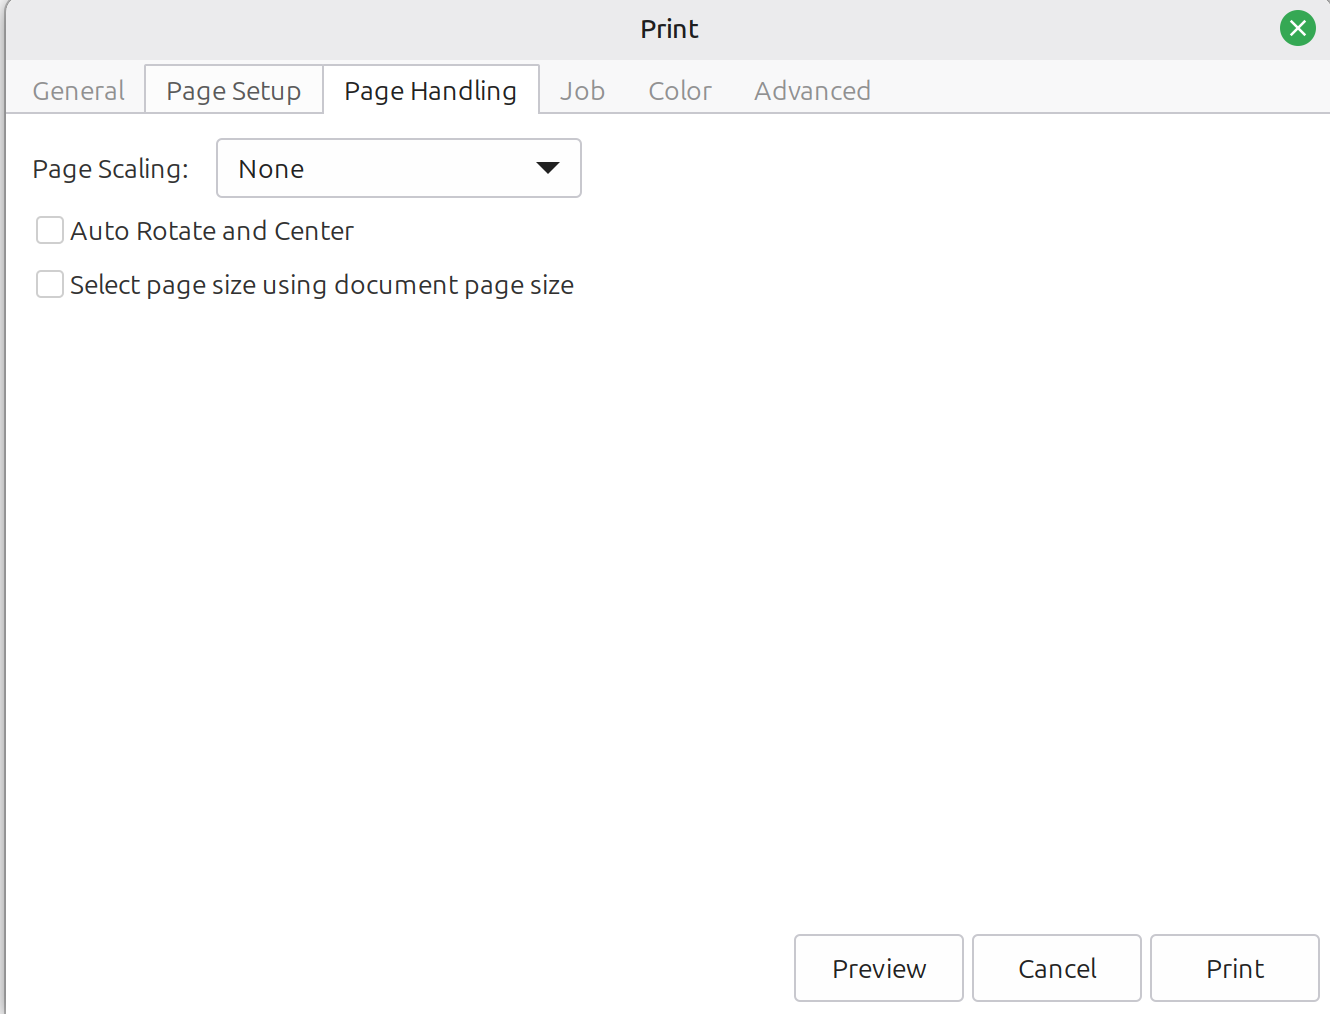
Page Handling sets Page Scaling: None and leaves Auto Rotate and Center unchecked. Auto-rotate can spin an imposed sheet to "better fit" and re-center it, which breaks the front-to-back and binding-edge relationship Folio built in.
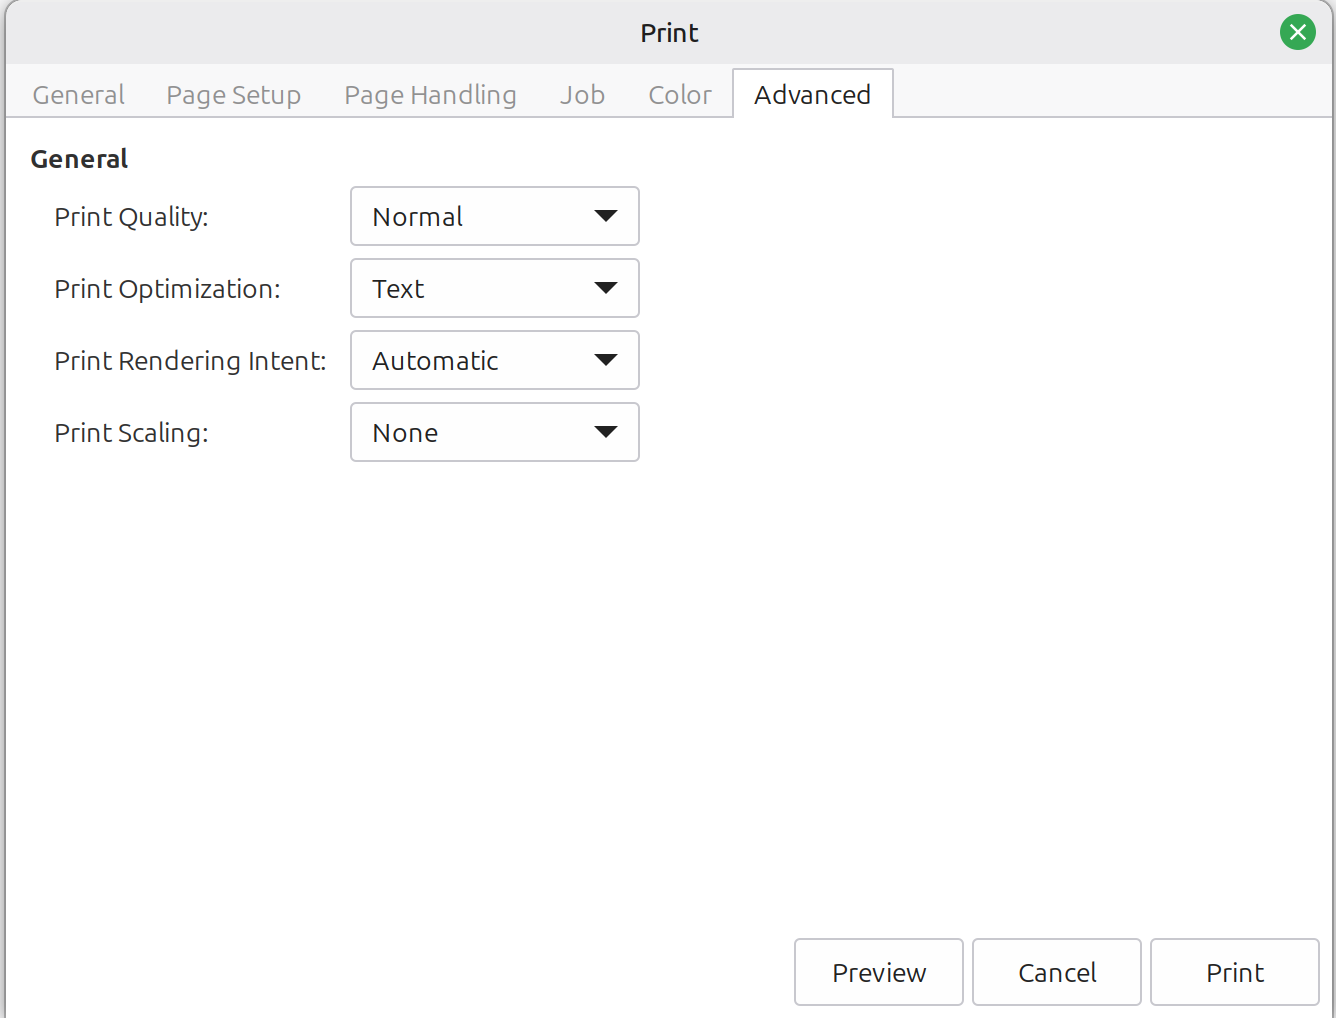
Acrobat hides a second scaling control on the Advanced tab. Print Scaling there is also None. Both have to say None, or the page still shrinks even with Page Scaling off. If your viewer only has one scaling control, that's one less place to check.
How do I set printer scaling and borderless on Linux, macOS, and Windows?
The labels differ by platform, but the four settings that matter map across all three:
| Setting | Linux (CUPS / GTK) | macOS | Windows |
|---------|--------------------|-------|---------|
| Scaling | print-scaling=none, or "Page Scaling: None" | Scale 100% | "Actual Size" |
| Borderless | "(Borderless)" paper-size variant | "(Borderless)" paper size | "Edge-to-edge"; set any enlarge slider to 0 |
| Duplex flip | Two-sided: Long / Short edge | Two-Sided: Long-Edge / Short-Edge binding | Flip on long / short edge |
| Auto-rotate | Rotate / orientation-requested off | Auto-Rotate off | Rotate off |
Can I use borderless printing for booklet imposition?
Borderless is safe for booklet imposition only when you also force scaling to 100% / None. On its own it usually enlarges the page two to five percent, which breaks every measured distance on the sheet.
Most printers leave a small border they can't print into, and a driver will sometimes shrink your sheet a hair to dodge that forced unprintable margin. Choosing the Borderless paper size removes that margin, so the driver no longer has a reason to shrink the page. But borderless on its own usually goes the other way and scales the page up to bleed ink off the edge, so it is safe only when you also pin scaling to 100% / None — and even then you must confirm true size with the 100 mm scale-bar check below. That is why some binders get cleaner results with it, but only with scaling locked.
The catch is that borderless usually has a second job built in. To guarantee ink reaches the edge despite the way paper feeds, most drivers quietly enlarge your artwork two to five percent so it bleeds off the sheet (Copy Express, Ilford). For a photo that enlargement is invisible. For an imposed signature it is poison. Every measured distance grows with it, and your fronts and backs stop meeting at the fold.
So use borderless only if you also pin scaling to None / 100% in every scaling control your viewer has. Then prove it: print Folio's calibration sheet and measure the 100 mm scale bar. Exactly 100 mm means borderless isn't enlarging your page. Anything else means it is, and you should switch to a normal bordered paper size at Actual Size and let Folio fit-and-center the small margin instead.
Why do the backs of my pages print upside-down?
Your printer is flipping the sheet on the wrong edge. Set the driver's two-sided binding to match what you told Folio — "long-edge" or "short-edge" — or, in Folio's printer setup, run the duplex check and choose the "Rotated" option so Folio compensates automatically.
Here's the mechanism, because the right fix depends on it. A folio sheet folds in half, so the two pages on the back have to sit at a 180° relationship to the two on the front for the fold to read correctly. Folio builds that in by imaging front pages rotated −90° and back pages rotated +90°, a net 180° between the faces. That part is correct and required.
It only stays correct if the printer flips the sheet about the axis Folio assumed. There are two ways a printer can turn the sheet over:
- Long-edge flip (the trade calls this work-and-turn). The sheet turns like a page in a book; the top edge stays at the top. The back lands upright relative to the front. No extra correction needed.
- Short-edge flip (work-and-tumble). The sheet tumbles end over end, which adds its own 180° on top of Folio's. The two flips stack, so the back prints upside-down.
Folio reads which case you're in from your printer profile's flip-direction setting. Short-edge means it reverses the back pages to cancel the extra tumble; long-edge means it leaves them alone.
So the fix is to make the two agree:
- In the driver, set the two-sided binding edge ("Flip on long edge" vs "Flip on short edge," or "long-edge binding" vs "short-edge binding") to match the flip direction in your Folio profile.
- If the backs still come out inverted, run the duplex check in Folio's printer setup and pick the "Rotated" option (the calibration sheet calls this enabling "Fix Rotation"). Folio then reverses the back pages for you.
The calibration sheet settles it without measuring. Its back page is self-reading: it prints "DUPLEX IS CORRECT" right-side-up and a "Fix Rotation" message upside-down. Whichever one you can read normally tells you the answer — if the "Fix Rotation" line is the readable one, choose the "Rotated" option in the duplex check.
My front and back don't line up at the fold
This is duplex drift: the back image is shifted relative to the front because the printer re-grips the sheet imperfectly on the second pass. Measure the offset once and let Folio split the correction across both sides.
When a sheet feeds through a second time for the back, the rollers don't catch it in exactly the same spot. The back image ends up translated a little from the front. The drift is often 1–5 mm; some consumer inkjets wander 10 mm or more, far enough to ruin a fold on its own. This is hardware front-to-back registration, and it has nothing to do with printer margins or scaling.
Folio compensates by splitting the measured offset in half and shifting the front and back in opposite directions, so they converge on the same fold line: front moves back by half, back moves forward by half. You measure the number; Folio applies it to every sheet.
To measure it, use the back page of the calibration sheet. It carries a center crosshair. Hold the printed sheet up to a light and read where the back crosshair falls against the front one. That displacement, in millimeters, is your duplex offset. Enter it once in your profile (the range clamps to ±15 mm) and you're done.
Why does a millimeter still show at the edges after I calibrate?
Because consumer duplex is not perfectly repeatable side to side, and the part of that error you can't calibrate away is smallest at the spine and largest at the outer edges. Calibration centers the back on the front. The leftover is a tiny front-to-back difference in the printer itself, a fraction of a percent of scale, or a hair of skew, and it grows the farther you get from center.
This is the one limit of home printing worth understanding, because it's easy to mistake it for an imposition fault. It isn't. Folio's front and back are built from the same geometry, proven three independent ways: the fold and sewing marks land at identical coordinates on both faces; the duplex correction splits in equal and opposite halves so the two sides converge on the same fold line, even at an exaggerated 2 mm offset; and the page boxes and rotation read byte-for-byte identical front to back. There is no front/back difference in the file. What's left is the printer.
Here's roughly what's happening. When a sheet feeds through the second time for the back, the paper has been warmed and gripped once already, and it comes back a hair different relative to the front. The duplex-drift fix in the section above handles the straight shift, the part that's the same across the whole sheet. What it can't handle is the part that changes across the sheet — a back that's a fraction of a percent larger or smaller than the front, or slightly skewed. (The exact flavor of that residual varies by printer, and it's small enough that pinning down whether it's scale, skew, or feed distortion takes a careful two-edge measurement; the practical point is the same either way.) That residual is zero where the two faces are pinned together at the center and opens up toward the edges, often reaching a millimeter or two at the outer corners on a full sheet.
Why doesn't the calibration sheet catch this?
Because the calibration sheet aligns on a single crosshair at the center of the page, and the center is exactly where this kind of error is smallest. A front/back scale or skew difference is anchored at the middle of the sheet and grows outward. At the crosshair it reads near zero, so the back lines up there and calibration looks clean. The error only appears once you print something that spans the full width of the sheet — like a signature fold, which runs edge to edge. Hold a real signature to the light and you can see the fold lines sit dead-on at the spine and drift apart toward the fore-edge, while the calibration sheet that produced it registered perfectly. Both readings are true. They're measuring different parts of the same sheet.
Does this actually hurt the book?
For most binding, no. You fold and sew at the spine, and the spine is where front and back are essentially perfect. It's the pivot, the place the error is zero. The millimeter only shows up out toward the fore-edge, the part of the page you trim flush after binding. Trimming removes it. So the place the error is largest is also the place you cut away, and the place you actually align by — the fold and the stitch line — is the place it's smallest.
What you can and can't fix
- You can calibrate the center to register. Measure the duplex offset with the hold-to-light crosshair and enter it once, as in the duplex-drift section above. That nulls the straight front-to-back shift, which is the larger and more common problem.
- You can let the trim absorb the edge millimeter. Front-to-back drift is worst at the fore-edge, which a flush trim after sewing removes anyway.
- You can't calibrate away a front/back scale or skew difference with a single center reading — the calibration target can't see an error that's zero at the center, and Folio's offset correction is a straight shift, not a scale or rotation.
- For near-perfect registration, the lever is the hardware, not the file. A printer with tighter duplex registration holds front-to-back closer across the whole sheet. Or take the duplexer's second pass off the table: print one side at a time and flip the stack by hand, so both faces run the same single-sided path instead of the duplexer's return path. That removes the front-to-back differential the auto-duplexer introduces — manual registration has its own small variance, but it isn't the systematic side-to-side drift this section is about.
The honest summary: Folio's imposition is symmetric front to back, and your calibration squares up the center. The last millimeter at the outer edges is the consumer printer's own duplex tolerance, it's at its worst exactly where you trim, and the fold and stitch you bind by are where it's smallest. For book work, that's a corner you can cut — literally.
How do I measure my printer's unprintable margins?
Print Folio's calibration sheet and read the corner rulers: most printers can't print to the very edge, so the first ruler tick you can actually see marks where that unprintable border ends. This only matters if your printer physically clips artwork — it feeds an optional advanced setting that defaults to zero.
The calibration sheet is two pages and does several jobs at once.
The front page is for margin and scale calibration. It has four corner rulers, one per corner, each starting at 0 right at the paper edge and counting inward to 15 mm. Most printers can't print to the very edge, so they clip the first stretch of each ruler; the first tick that survives tells you that edge's unprintable margin. That number feeds an optional advanced clipping-margin field that defaults to zero, separate from the duplex-offset reading you take from the back page. If you do set it, read all four corners independently. Printer margins are often asymmetric, worth measuring per edge, and Folio honors each edge on its own. The 100 mm scale bar lives on this page too, for the scaling check above.
The back page is the duplex diagnostic plus a bookbinder's reference. Alongside the self-reading "DUPLEX IS CORRECT" check and the hold-to-light crosshair for drift, it prints a set of tools at known scale: a center-finder ruler, a 45° mitre template, a paper grain test, a paper-thickness gauge, a spine-width formula, and 100% and 50% black ink swatches so you can check your printer is laying down solid, even density.
These readings feed two different, decoupled fields. The hold-to-light crosshair reading is your front-to-back (duplex) offset: type it into Front-to-Back Alignment, not into printer margins. The corner rulers only matter if your printer physically clips artwork at an edge, which is an optional advanced setting most users leave at zero. With your duplex offset entered, Folio shifts front and back toward each other so the next print should land much closer to register, within roughly a millimeter or two, the limit of consumer-printer repeatability.
When you print the imposed sheet at Actual Size (100%, scaling None), Folio's fold and sewing marks land on the same calibration crosshair the corner rulers reference. They sit on register, to within your printer's normal tolerance, which is well under a millimeter on a typical inkjet or laser printed actual size. This holds only at actual size. Any "fit," "shrink," or borderless enlargement scales the marks off the crosshair along with everything else on the sheet.
Do I have to recalibrate for every job?
No. Calibrate once per printer. Make a separate profile only if you switch to a paper size that changes the margins, and re-run calibration if you change printers or paper stock.
Do printer margins matter for booklet imposition?
Small symmetric printer margins are often absorbed by Folio's fit-and-center step, so they don't change the output; large or asymmetric margins do shift it. Two different things get called "margins," and they behave completely differently.
Printer (hardware) margins define the printable area: the paper minus the borders the printer can't reach. In Folio these live in an optional advanced clipping-margin field that defaults to zero and is separate from the duplex-offset reading; most users leave it untouched. Folio's default behavior is to fit each page into its cell preserving aspect ratio, then center it. So when the printable area shrinks by a few millimeters, the page just re-scales and re-centers to fit. The content stays centered and proportional, and the difference is often visually invisible because fit-and-center absorbs it. That's why two binders can enter very different small margin numbers and get visually identical output.
Small symmetric printer margins only become visible when they're large enough to shrink the page noticeably, when they're strongly asymmetric (a big left/right imbalance shifts content off-center, because Folio respects each edge independently), or when the printable area gets so small that the layout reports "margins exceed sheet size."
Binding (spine/gutter) margin is a different animal, and it always matters. It's applied on the spine side of each page, with the fore-edge on the outer side, and it carves out the dead zone that the fold and the stitching consume. Get it wrong and your content crowds into the gutter after binding, and no amount of printer calibration will save it.
One thing printer margins never do is move the fold. The fold is always at the physical center of the sheet; printer margins shift the printable area, not the crease. So "my margins are off" can never be the reason "my fold is in the wrong place." If your output looks off-center, suspect asymmetric printer margins or duplex drift, not the size of a symmetric margin.
What is creep in bookbinding, and how do I fix it?
Creep (also called push-out or shingling) is the way inner pages get pushed outward toward the fore-edge in a thick folded signature: fold several sheets together and the accumulating paper thickness shoves the inner ones' content out past the outer ones at the fore-edge, so trimming the stack flush costs the inner pages more of their content. To fix it, enable creep compensation in Folio and enter your measured paper caliper. Folio shifts each inner page back toward the spine to cancel that outward push.
Folio compensates by shifting inner pages toward the spine, with the shift growing from zero on the outermost sheet to a maximum on the innermost — each sheet pushed by the thickness of the sheets wrapping it. The per-page direction follows the fold, not a naive spine split, so pages that land on top of each other after folding share the same correction sign.
Creep only matters for multi-sheet signatures. A single folded sheet, or a paper thickness of zero, gets no shift at all. The calibration back page has a thickness gauge for measuring the caliper you'll enter.
How do I fix a printed PDF that looks wrong?
Work through it in this order, matching the symptom to the setting:
- Output is shrunk (the 100 mm scale bar measures short). Turn off "Fit to Page" / "Shrink oversized pages" and print at Actual Size, from a real PDF viewer rather than the browser.
- Backs print upside-down. Match the driver's flip edge (long-edge vs short-edge) to the flip direction in your Folio profile, or choose the "Rotated" option in Folio's duplex check so it compensates.
- Front and back miss at the fold. Measure the duplex offset with the hold-to-light crosshair and enter it once; Folio splits the correction across both sides.
- Output looks off-center. Check for asymmetric printer margins, then duplex drift. A symmetric margin won't shift centered content, and printer margins never move the fold.
If page numbers are landing on the wrong edge or upside-down after you impose, that's a related but separate problem — see Page Numbering in Bookbinding.
Calibrate your printer in Folio and the measured numbers feed straight into every sheet it images.